The ODI environment comes with a concept of Agent.
If you have to give a one liner crisp definition about what an ODI Agent is, we will say that it is:
An ODI runtime process that orchestrates ETL flow.
In other words, an ODI agent is a java process, that facilitates the execution of code developed in ODI.
ODI 11g has 2 types of agent: Standalone agent and J2EE agent.
JEE enable ODI agent that allows the ODI agent to inherently take advantage of the application server's enterprise features, such as high availability, connection pooling and so on. However a standalone agent does not give all this features but it does not require a Application server to host it.
In this article, lets try to explore how standalone agents can be configured and used in ODI.
Navigate to the <oracle installed location>\oracledi\agent\bin
The directories may changes from installation to installation , based on where have you installed them.
You will see 2 files there: odiparams.bat and odiparams.sh. The installation folder contains both the files, based on the platform we need to choose which file needs to be edited.
So for a typical windows installation, open the odiparams.bat file. Modify the below parameters.
set ODI_MASTER_DRIVER=oracle.jdbc.OracleDriver
set ODI_MASTER_URL=jdbc:oracle:thin:@localhost:1521:ORCL
set ODI_MASTER_USER=<name of the master repository schema>
set ODI_MASTER_ENCODED_PASS=aYyp5IHh5AGwjgDJw2DgCy
How to generate the encoded password?
In the same folder, type the following command in cmd:
>> encode <master_repo_schema_password>
one encoded string appears.
copy the above encoded string and change the parameter value accordingly.
Similarly change the following parameters:
set ODI_SUPERVISOR=SUPERVISOR
set ODI_SUPERVISOR_ENCODED_PASS=h2yXu8fMrWKoE90kGUN5Extg (generate this string using the encode utility)
One more parameter:
set ODI_SECU_WORK_REP=WORKREP1 (this would be the name of the workrepo associated with the master repo)
Login to ODI studio and Navigate to Topology:
Under Agents: Right Click and select New Agent:
Enter the information:

once the information is entered in the page: navigate to agent/bin folder.
Execute the following command:
>>agent/bin>agent -NAME=<name of the Agent> -PORT=<port no> (The value for the parameters is as per the values given while creating the agent in ODI studio).
The cmd window will display this, once the agent is started:

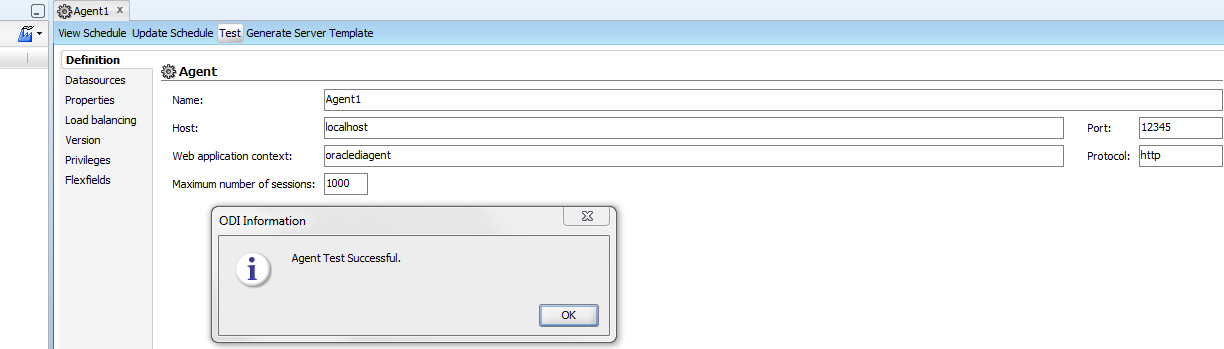
Go to the agent page in ODI studio and click on the test button, since the agent is running, it will show agent successfully connected message:

That's it, the standalone ODI agent is configured.
Please leave comments if there are any doubts regarding any concepts.
Navigate to the <oracle installed location>\oracledi\agent\bin
The directories may changes from installation to installation , based on where have you installed them.
You will see 2 files there: odiparams.bat and odiparams.sh. The installation folder contains both the files, based on the platform we need to choose which file needs to be edited.
So for a typical windows installation, open the odiparams.bat file. Modify the below parameters.
set ODI_MASTER_DRIVER=oracle.jdbc.OracleDriver
set ODI_MASTER_URL=jdbc:oracle:thin:@localhost:1521:ORCL
set ODI_MASTER_USER=<name of the master repository schema>
set ODI_MASTER_ENCODED_PASS=aYyp5IHh5AGwjgDJw2DgCy
How to generate the encoded password?
In the same folder, type the following command in cmd:
>> encode <master_repo_schema_password>
one encoded string appears.
copy the above encoded string and change the parameter value accordingly.
Similarly change the following parameters:
set ODI_SUPERVISOR=SUPERVISOR
set ODI_SUPERVISOR_ENCODED_PASS=h2yXu8fMrWKoE90kGUN5Extg (generate this string using the encode utility)
One more parameter:
set ODI_SECU_WORK_REP=WORKREP1 (this would be the name of the workrepo associated with the master repo)
Login to ODI studio and Navigate to Topology:
Under Agents: Right Click and select New Agent:
Enter the information:

once the information is entered in the page: navigate to agent/bin folder.
Execute the following command:
>>agent/bin>agent -NAME=<name of the Agent> -PORT=<port no> (The value for the parameters is as per the values given while creating the agent in ODI studio).
The cmd window will display this, once the agent is started:
Go to the agent page in ODI studio and click on the test button, since the agent is running, it will show agent successfully connected message:
That's it, the standalone ODI agent is configured.
Please leave comments if there are any doubts regarding any concepts.
No comments:
Post a Comment